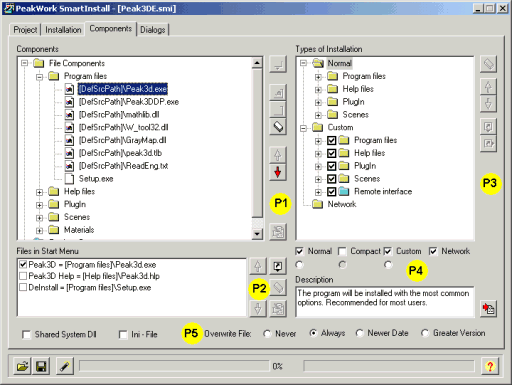
The following figure shows an example of the Components Page. The features labelled with yellow circles (P1 to P5) are described below.

The following section is a little more complicated than the proceeding paragraph.
If you however understood the underlying concept, you should be able to execute also the steps described here fast and easily.
The structure of a SmartInstall Installation application is comparable with the file-tree on your fixed disk.
Different folders exist, in which again subfolders and in addition files can be contained.
Additionally to the ability of your fixed disk to organize files, SmartInstall treats also the registry entries in the same manner.
The hierarchy in SmartInstall from bottom to top (or in the example of the fixed disk from the drive to the file) is shown below:
Thus the installation types represent the base of an installation. Without a type of installation (SmartInstall does not permit this case) neither files nor registry entries could be created. SmartInstall contains therefore always the type of installation "Normal". Even if you include multiple types of installation and however do not make a dialogbox "Setup Type" available, SmartInstall uses the type of installation "Normal".
Since the different installation types cannot know, which components belong to its installation, you must assign in the next step those components to them, which are to be created during the installation.
You can arrange the components within a type of installation also hierarchically (e.g. you could arrange a file component [help for samples] as a subcomponent of a file component [samples]).
This hierarchy does not have a practical meaning for all installation types except the type of installation "Custom", nevertheless is the use with all types of Installation for reasons of clarity recommended.
The type of installation "Custom" permits the user to select freely from the components, which you assigned to this type of installation.
Using the hierarchical arrangement of the components and the possibility to assign individual components the status "Use Not As Option" you can construct very complex installations without demanding a lot from the user.
You can find more information how to handle that type of installation "Custom" in the description of the Types of Installation section.
The components contain the actual installable data, to which beside the files also the registry entries belong. These entries are visible and capable for editing only in the window "Components". Since the components, which you have arranged in the window "Types of Installation" as "leaves" to the individual types of installation, just represent references to the components in the window "Components", all modifications made to a component affect directly the types of installation.
Continue with Controls in the Component pageLast modified: April 13, 2000