The following figure shows an example of the Installation Page. The features labelled with yellow circles (P1 and P2) are described below.
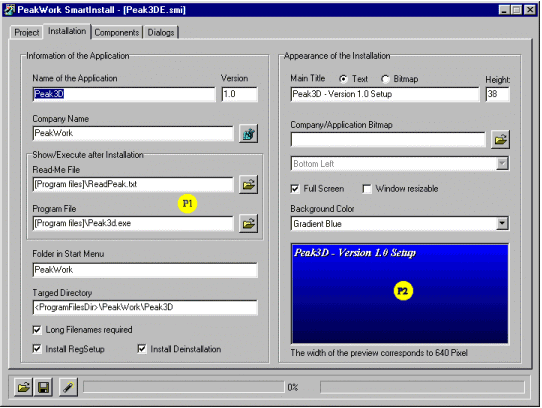
The left side of this page contains a set of data entry fields which are used to specify the name of the application and certain properties of how it is to be installd.
The right side of this page has a set of controls which determine the appearance of the background for each of the installation dialog pages. The Dialog page may be used to preview the full appearance of each of the resulting dialog pages.
The characteristics of each of these controls are described below.
Return to The Installation Page (top).Enter the name of your application here. This is a descriptive name or title for all software to be installd with the resulting software installation package, not a file name for the executable software. This name will appear in almost every dialog page to appear during the installation process, and this is also used to record information about the application in the Windows registry. For registered users, this entry must match the project name used to obtain the registration code specified on the Dialog page.
This value is not seen in any of the installation dialog pages, but is used to create version-dependent entries in the registry. If the version number specified here matches the version number previously recorded in the registry for this application name, then all previously recorded registry entries for this version of the application will be overwritten when this installation is executed. If this version number does not match a version number previously recorded for this application, a new data record will be created in the registry, and your customer will be able to operate with multiple versions and can deinstall each version independently.
This entry occurs in some of the installation dialog pages. If you click on the button with the registry symbol to the right of this field, SmartInstall will retrieve the Company Name that was specified when the operating system (Windows 9x/NT4/2000) was installd.
These values are only used if the option "Execute Program" has been selected (checked) in the Dialog Page.
Notes: You can use all aliases supported by SmartInstall for these entries. To obtain a list of aliases, click the right mouse button on the input field while pressing the [Shift] key. All registry entries belonging to the installation will already be registered at this point and can be used for the execution.
This entry determines the name of the folder to be created in the start menu under "Start-Programs". If the "Select Program Folder" dialog page has been selected as part of your installation package in the Dialog Page, the name provided here will appear in this dialog page as the default value for the name of this folder. The actual name used for this folder may be modified by the user during the installation process.
A new folder in the Start-Programs menu will be created during the installation only if (a) a folder name has been specified in this field, (b) the list "Files in Start Menu" on the Component Page contains at least one entry, and either (c) the user does not remove the entry in this field, or (d) the "Select Program Folder" has not been selected in the Dialog Page.
Use this field to specify the name of the folder into which your files should be installd. If either the "Select Target Dir" dialog page, or the "Setup Type" dialog page have been selected in the Dialog Page, the user will be able to modify these choices during the installation process.
Note: You can use all aliases supported by SmartInstall for these entries. To obtain a list of aliases, click the right mouse button on the input field while pressing the [Shift] key.
Select this option if your application installs or supports files with long file names.
Select this option if you want to enable your customers to update registry entries after installation.
If this option has been selected, SmartInstall will copy a small program called "setup.exe" and registry information indicated by the installation package into the target directory. This program may be used to update the appropriate registry entries if the application is subsequently moved to a new drive or folder, if the drive letter changes due to addition or removal of disk drive, or if the operating system must be re-installd.
Note: You can also create a shortcut to this file in the "Files in Start Menu" list on the Components Page.
Select this option if you want to provide your customers with a means to completely remove all installd files, folders, and registry entries from their computer.
If this option is selected, SmartInstall will copy a small program called "setup.exe" into the target directory. Only files and folders which were created by SmartInstall during the installation are removed by this program. Folders which existed before the installation, and folders which are not empty are not removed by the deinstallation.
[? What about dll's in the Windows system folder that may be used by other programs, possibly installd after this application was installd? ?]Note: You can also create a shortcut to this file in the "Files in Start Menu" list on the Components Page. In this case, you must also arrange to pass the parameter "PWSIREMOVE" to "setup.exe" when it is used for deinstallation.
The installation title is placed in the upper left corner of the installation window. The contents of the installation title can be specified either as text or as a bitmap.
If the installation title is specified as text, then the text string to be used for the installation title must be entered in this field, and the font size to be used for the title may be specified in the "Height" field.
If the installation title is provided by a bitmap, then the name of the image file which contains the installation title is specified in the data entry field, and a file-open button appears to the right of the data entry field. The name of the bitmap image file may be entered directly in the data entry field, or the file may be selected with the help of a file-open dialog which appears when you click on the file-open button.
The image file must be provided in the form of a Windows Bitmap (BMP) file format.
The installation title bitmap is drawn transparently. All pixels having the same color as the pixel in the top-left right corner are treated as transparent.
The resulting appearance of the installation background can be seen immediately in the lower right portion of this dialog page (P2). Following manual input of title text or a bitmap file name, the [Enter]-key must be pressed before the background preview window is updated.
This field may be used to identify a bitmap image containing a logo associated with your company or the application to be installd. The name of the bitmap image file may be entered directly in this field, or it may be selected with the help of a file-open dialog opened by clicking on the file-open button to the right of the file name data entry field.
If no file name is specified, then no logo is drawn. If a bitmap file name is specified here, then the following listbox may be used to select one of five predefined locations for placing this image within the dialog pages (top-left/right, bottom-left/right and center).
The installation title bitmap is drawn transparently. All pixels having the same color as the pixel in the top-left corner are treated as transparent.
The resulting appearance of the installation background can be seen immediately in the lower right portion of this dialog page (P2). Following manual input of title text or a bitmap file name, the [Enter]-key must be pressed before the background preview window is updated.
Select this option to use the entire screen when starting the installation.
When this option is enabled, the window gets an resizable border. In this case, the user will be able to determine the size and position of the installation window. Otherwise the user can only minimize (iconify) the window or display it in the original size.
If this option is not checked, the "Full Screen" option should be checked. Otherwise the installation takes place in a window with an undefined size which cannot be changed.
This field provides a listbox which allows you to select a solid color or gradient color from a list. The appearance of the selected background color is shown immediately in the lower preview window (P2).
Enter the Name of the application, the Version number, and the company name.
If the installation dialog "Execute Program" has been selected on the Dialog page, fill in at least one of the two fields Read-Me file and/or Program file, Note: Both fields accept aliases.
Go to the Folder in Start Menu field, and enter the name of the folder to be added to the "Start-Programs" menu. Please also read the description of this field under Information about the Application.
Specify a default name of the folder where the software should be installd in the Target Folder field. aliases are supported here.
Check Long filenames required, if your software uses or permits long file names.
Check Install RegSetup if you wish to enable users to update the registry entries used by your program without needing to perform a complete new installation.
Check Install Deinstallation if you wish to enable the user to deinstall the this application package at a later time.
Specify whether the Installation Title is to be described by a text string or by a Windows Bitmap image file.
If the Installation Title is defined by a text string, enter the text string in the data entry field, and enter the font size in the "Height" box. Inspect the background preview window at the bottom of the page to make sure the results are satisfactory.
If the Installation Title is defined by a Windows Bitmap image file, enter the file name of the image file either directly or through the help of the file-open dialog. Inspect the background preview window at the bottom of the page to make sure the results are satisfactory.
If you wish to display a logo image suitable to your company or this application, enter a valid file name (Windows Bitmap BMP file) in the Company/Application Bitmap field. Then use the listbox below this field to select one of the five positions for this image within the background. Inspect the background preview window at the bottom of the page to make sure the results are satisfactory.
Select the Full Screen option if you want the installation to start up occupying the entire screen.
Select the Resizable Window option if you want the enable users to control the size and position of the installation window.
Select a solid color or color gradient from the Background Color listbox. Inspect the background preview window at the bottom of the page to make sure the results are satisfactory.
Last modified: April 15, 2000